Tips and Tricks
Diamond Painting Top Tips And Tricks
So, you think you’ve mastered the art of diamond painting? Well, prepare to be dazzled! We’re going to share with you some diamond painting tips that will take your diamond painting skills to a whole new level.
From creating the perfect workspace to properly framing and sealing your masterpiece, we’ve got all the innovative techniques you need. Get ready to shine brighter than ever before. Let’s dive in and unlock your diamond painting potential.
Use Easels And Craft Tables For Comfort
You should use easels and craft tables for a more comfortable and organized diamond painting experience. When it comes to pursuing your diamond painting hobby, having the right tools can make all the difference. Easels and craft tables are essential items that can enhance your creativity and productivity.
Using an easel allows you to work on your diamond painting at an upright angle, providing a more ergonomic position for your neck and back. This not only reduces strain but also allows you to focus better on your artwork.
Craft tables, on the other hand, provide a dedicated space for all your diamond painting materials. They come in various sizes, so you can choose one that fits your needs.
Craft tables offer ample storage options, such as drawers or shelves, where you can keep your diamond paintings in progress, beads, pens, and other supplies neatly organized. This ensures that everything is easily accessible when you need them during your crafting sessions.
Moreover, using craft tables with built-in lighting features adds another level of convenience. Proper lighting is crucial for accurately placing tiny beads onto the canvas.
Investing in easels and craft tables will transform your diamond painting experience into a more enjoyable and efficient one. So go ahead and upgrade your workspace today!
Use A Chair That Fits You
Finding a chair that fits your body properly can greatly enhance your diamond painting experience. When it comes to indulging in this innovative craft, comfort and support are key. A well-fitting chair will provide you with the necessary stability and flexibility to create your masterpiece.
To begin, consider the height of the chair. Your feet should be flat on the ground with your knees at a 90-degree angle. This will ensure proper posture and prevent any strain on your back or neck. Look for chairs that come with adjustable heights so you can customize it to suit your needs.
Next, focus on the seat cushioning. Opt for a chair that has ample padding to keep you comfortable during those long hours of diamond painting. Memory foam or gel cushions are great options as they conform to your body shape and provide optimal support.
Furthermore, pay attention to the chair’s backrest. It should have good lumbar support, allowing you to maintain proper spinal alignment while sitting for extended periods of time. Adjustable backrests are ideal as they let you find the perfect position for maximum comfort.
Lastly, consider investing in a chair with armrests. They provide additional support for your arms and shoulders, reducing fatigue during intricate detailing work.
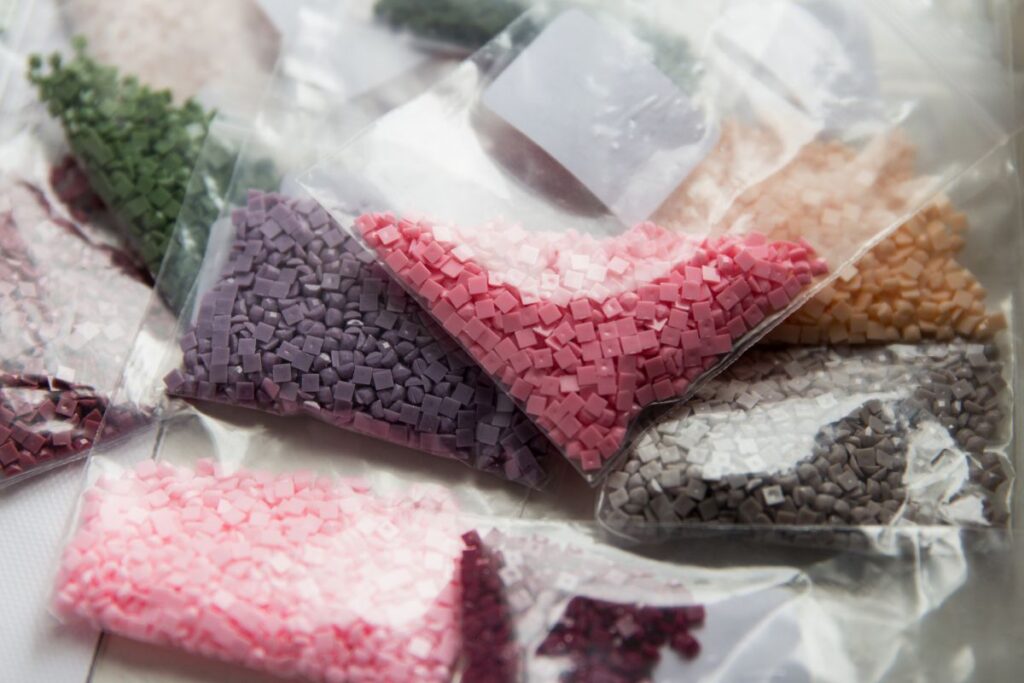
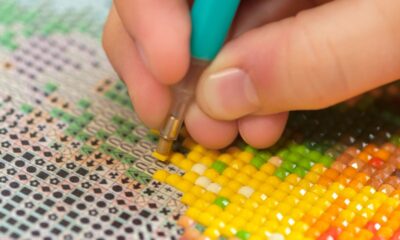
Sort Your Diamonds
To ensure an organized diamond painting process when opening up a new diamond painting kit, start by sorting your gems into different color categories.
This simple yet crucial step will save you time and frustration later on. When you have a clear visual of the colors at hand, you can easily identify and locate the diamonds needed for each section of your adhesive canvas.
Sorting your diamonds may seem like a small task, but it is one that can make a big difference in your overall experience with diamond painting. By separating the colored diamonds into individual containers or compartments, you eliminate the risk of mixing them up or losing track of which ones you have already used.
When it comes to choosing how to sort your diamonds, there are various methods you can try. Some people prefer using small plastic bags or pill organizers, while others opt for specialized diamond storage boxes with multiple compartments. Find a system that works best for you and stick to it.
Use A Tray
Using a tray to hold your sorted gems can help keep them organized and easily accessible as you work on your diamond painting project. Not only does it provide a convenient way to store your diamonds, but it also allows for efficient sorting and easy access while you’re working on your masterpiece.
Here are four reasons why using a diamond tray is essential for an innovative diamond painting experience:
- Organization: With a designated tray for each color of diamond, you can easily sort and arrange them according to the diamond legend. This ensures that you have a clear view of all the colors, making it easier to find the ones you need.
- Accessibility: Having all your diamonds neatly arranged in trays means they are within arm’s reach whenever you need them. No more searching through piles or bags to find the right color – simply pick up the tray and start painting!
- Efficiency: The applicator tool used in diamond painting requires precision and speed. By having your diamonds sorted and stored in trays, you can quickly grab the desired color without wasting time rummaging through containers or bags.
- Extra Diamonds: Sometimes, kits come with extra diamonds in case of accidents or mistakes. Instead of scattering them around, keep them safely stored in trays so they don’t get mixed up with other colors.
Using diamond trays not only keeps your workspace neat but also streamlines the entire process, allowing you to focus on creating stunning works of art with ease and efficiency!
Create A Perfect Workspace And Take Your Time
Make sure you have a well-organized and comfortable workspace where you can take your time to create a beautiful diamond painting masterpiece. Setting up the perfect workspace is essential for an enjoyable diamond painting experience.

Start by finding a quiet area where you can focus and let your creativity flow. Clear any clutter from your working area and gather all the necessary tools within reach. A clean, flat surface like a table or desk is ideal for spreading out your canvas and supplies.
To enhance your diamond painting journey, consider investing in some additional accessories such as a light pad or magnifying glass. These tools can help improve visibility and make it easier to work with tiny diamonds.
Remember to take your time with each step of the process. Diamond painting is meant to be a relaxing hobby, so don’t rush through it. Pay attention to the details and enjoy the meditative nature of placing each diamond onto the canvas. Taking breaks when needed will also prevent eyestrain or fatigue.
Don’t Be Afraid To Experiment
Don’t hesitate to try new techniques and explore different color combinations when working on your diamond painting masterpiece. Diamond painting is all about creating something unique and eye-catching, so don’t be afraid to step out of your comfort zone and experiment with different ideas. Here are some top tips to help you make the most of your creative journey:
- Mix it up: Instead of following the pattern exactly, consider mixing colors or using shades that are slightly different from what’s suggested. This will add depth and dimension to your artwork, making it truly one-of-a-kind.
- Play with canvas size: Don’t limit yourself to standard canvas sizes. Try working on a larger or smaller canvas to see how it affects the overall appearance of your piece. You might discover a new perspective or find that certain details stand out more prominently.
- Get creative with drills: While round drills are the most common choice for diamond painting, don’t forget about square drills! They can add a modern and geometric touch to your artwork. Additionally, you can also experiment with special-shaped drills like hearts or stars for added visual interest.
Improve Your Organization
To enhance your organization skills, try utilizing a variety of storage containers for your diamond painting supplies. Organization is key when it comes to diamond painting, as it allows you to easily locate and access all the materials you need for your projects. By improving your organization, you can streamline your workflow and make the process more efficient.
One top tip is to invest in clear plastic storage boxes with compartments or dividers. These boxes allow you to separate and categorize different colors of diamonds, making it easier to find the specific ones you need. You can also label each compartment with the corresponding color code for quick reference.
Another helpful tool is a portable carrying case specifically designed for diamond painting supplies. These cases typically have various pockets and compartments where you can store your tools, wax pads, trays, and even partially completed canvases. This way, everything will be neatly organized and ready to go whenever inspiration strikes.
Additionally, consider using small stackable containers or jars for storing leftover diamonds from completed projects. This prevents them from getting mixed up with new batches and saves time on sorting through multiple bags.
Use Weight to Remove Canvas Creases and Imperfections
You can easily remove creases and imperfections from your canvas by using the weight of heavy books or objects. When it comes to diamond painting, achieving a flawless result is key. But sometimes, pesky creases and imperfections can hinder your progress. Luckily, there’s a simple solution that harnesses the power of weight.
Firstly, gather some heavy books or objects that you have lying around. These will serve as your tools for smoothing out those unwanted wrinkles on your canvas. Lay your canvas flat on a clean surface and place the heavy books or objects on top of it. The weight will help flatten out any creases and ridges, leaving you with a smooth surface to work on.
Leave the weights on for several hours or overnight if possible to ensure maximum effectiveness. Once you remove the weights, you’ll notice a significant improvement in the appearance of your canvas. Those stubborn creases will be gone, allowing you to focus on creating beautiful diamond paintings without any distractions.
So next time you encounter canvas creases and imperfections in your diamond painting journey, don’t fret! Simply grab some heavy books or objects, apply some weight, and watch those wrinkles disappear like magic. With this top tip in mind, you’ll be well-equipped to achieve stunning results in no time at all!
Do not Remove the Protective Sheet At Once
Before removing the protective sheet, it’s important to take your time and be cautious. Diamond painting is a delicate art form that requires precision and attention to detail.
Here are some top tips to help you successfully remove the protective sheet without damaging your masterpiece:
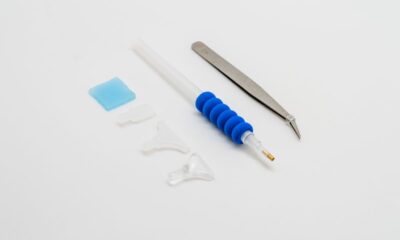
- Gather your tools: Before starting, make sure you have all the necessary tools handy, such as tweezers or a craft knife.
- Start from the corners: Carefully lift one corner of the protective sheet using your chosen tool. Slowly peel back the sheet, working your way towards the center.
- Avoid touching the adhesive layer: It’s crucial not to touch or press down on the sticky part of the canvas while removing the protective sheet. This can leave fingerprints and affect adhesion.
- Smooth out any air bubbles: As you remove the protective sheet, pay attention to any air bubbles that may form under it. Use a small roller or your fingertips to gently smooth them out.
Storing Diamond Paintings
Now that you know not to remove the protective sheet all at once, let’s talk about how to store your diamond paintings. Keeping your completed masterpieces safe and organized is crucial for any diamond painting enthusiast.
When it comes to storing your diamond paintings, there are a few top tips that can help preserve their beauty and keep them in pristine condition. One of the best options is to use portfolio cases or cardboard boxes specifically designed for this purpose.
Portfolio cases provide a convenient and professional way to store your diamond paintings. They come in various sizes and often have multiple compartments, allowing you to store several artworks together while keeping them separate and protected from dust or damage.
On the other hand, if you prefer a more budget-friendly option, cardboard boxes can be an excellent choice as well. Simply place each completed diamond painting inside a clear plastic sleeve or envelope before stacking them neatly in the box. This will prevent any accidental scratching or bending during storage.
Use Washi Tape to Section Off Canvases
If you’re looking for an easy and customizable way to section off your canvases, try using washi tape. This innovative tape is perfect for diamond painting enthusiasts who want to create distinct sections on their canvases without any hassle.
To section off your canvases using washi tape, simply measure the desired size of each section and cut the tape accordingly. Then, stick the tape onto the canvas along the edges of each section, creating clean lines that separate different areas. The best part is that washi tape is easily removable without leaving any residue or damaging your artwork.
Using washi tape not only helps you stay organized while working on larger diamond painting projects but also makes it easier to navigate through complex patterns. By dividing your canvas into manageable sections, you can focus on one area at a time and prevent mistakes or confusion.
Upcycle Egg Cartons to Organize Diamonds
Looking to organize your diamonds in a creative way? Upcycle egg cartons provide a convenient solution for keeping your diamond painting supplies neat and easily accessible. Here are some tips on how to make the most of this innovative storage option:
- Separate Colors: Use each individual compartment of the egg carton to store different colored diamonds. This will help you quickly find the color you need while working on your diamond painting masterpiece.
- Labeling: Label each compartment with the corresponding color using small sticky notes or washi tape. This will make it even easier to locate specific colors when you’re in the middle of a project.
- Sort by Size: If you have different sizes of diamonds, use separate rows within the egg carton to organize them accordingly. This will prevent any confusion and save you time during your diamond painting sessions.
- Use Felt: To ensure that smaller diamonds don’t get lost, consider placing a small piece of felt or fabric at the bottom of their designated compartments. This will keep them secure and prevent them from rolling around.
Label Each Diamond Bag
Labeling each bag of diamonds with the corresponding color will help you easily identify and locate the colors you need for your diamond painting project. When you embark on a creative journey like diamond painting, organization is key.
The last thing you want is to spend precious time searching for the right shades amidst a sea of tiny gems. By taking a few extra moments to label each diamond bag, you’ll save yourself from frustration and make your artistic process smoother.
Imagine sitting down at your work station, surrounded by neatly labeled bags filled with vibrant diamonds. With just a glance, you can effortlessly find the specific color needed for your masterpiece. This simple act of labeling may seem small, but its impact on your efficiency and enjoyment cannot be overstated.
To label each diamond bag effectively, use clear stickers or adhesive labels that won’t obstruct or fade over time. Write the corresponding color code or name prominently on each label so there’s no confusion. Additionally, consider organizing your bags in a logical manner based on color families or numerical order.
Innovative artists understand the value of smart organization techniques when it comes to their crafts. By labeling each diamond bag, you’re embracing this innovative mindset and setting yourself up for success in your diamond painting journey. So go ahead and give it a try – let the colors speak louder than words as they guide you through an artful adventure.

Organize Diamonds for Multi-Placement
To make your diamond organization even more efficient, try grouping and sorting the bags based on their color families or numerical order. This will not only save you time but also enhance your overall diamond painting experience. Here are some tips to help you organize your diamonds for multi-placement:
- Color Families: Sort the bags of diamonds based on their color families. This way, when you are working on a specific section of your diamond painting, you can easily locate the colors you need without having to search through all the bags. You can group similar shades together or arrange them in a rainbow-like pattern for visual appeal.
- Numerical Order: Another effective way to organize your diamonds is by sorting them in numerical order. Each bag of diamonds is usually labeled with a number that corresponds to a symbol on the canvas. By arranging the bags in sequential order, you can quickly find and place the correct diamonds as you work through different sections of your artwork.
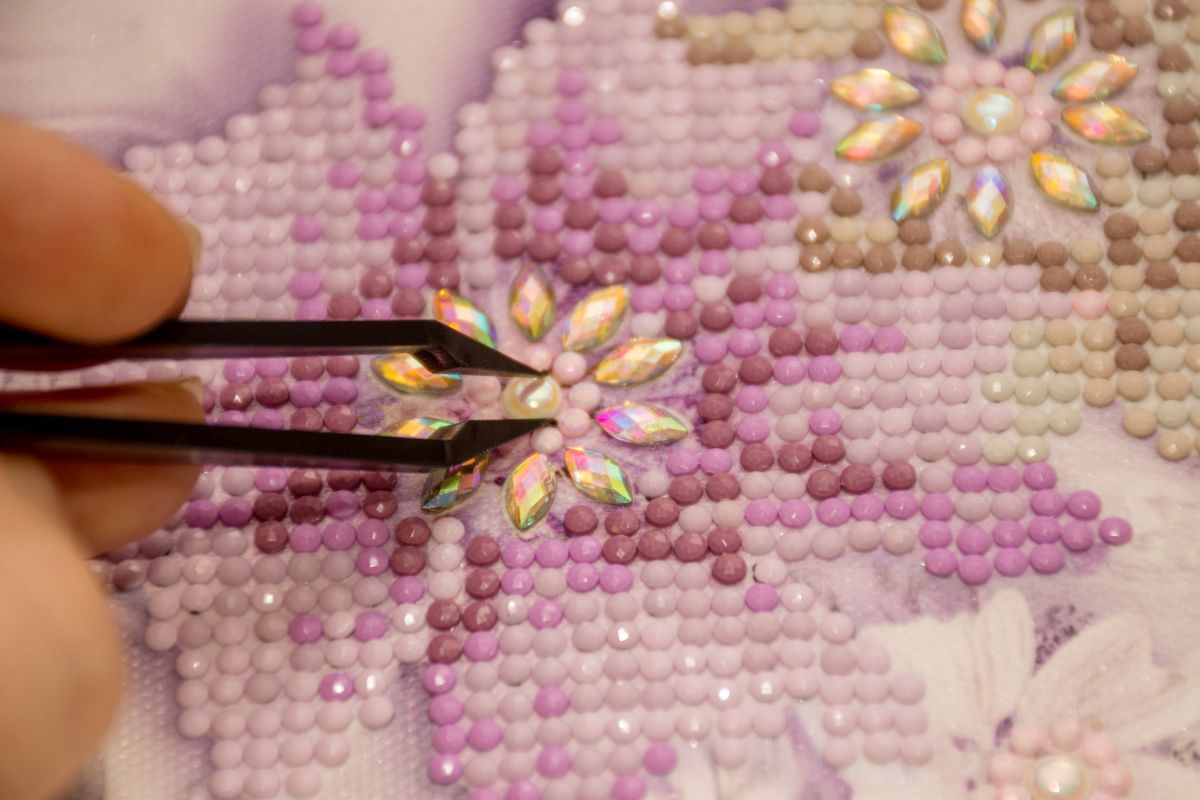
Try Using a Diamond Multi-Placer for More Efficient Crafting
Using a diamond multi-placer can significantly improve your crafting efficiency. If you’re looking for innovative ways to enhance your diamond painting experience, this is a must-have tool. Drill pens come in different varieties and a diamond multi-placer allows you to place multiple diamonds at once, saving you time and effort.
With the traditional method of using just one diamond pen, it can be quite tedious and time-consuming to individually pick up and place each diamond onto the canvas.
However, with the diamond multi-placer, you can pick up several diamonds at once and effortlessly transfer them onto their designated spots on the canvas.
Not only does this tool save you time, but it also ensures greater accuracy in placing the diamonds. You no longer have to worry about misaligning or accidentally dropping diamonds while trying to place them one by one. The diamond multi-placer provides a steady grip on multiple diamonds, allowing for precise placement every time.
Investing in a diamond multi-placer is an excellent way to make your crafting sessions more efficient and enjoyable. It will streamline your workflow and allow you to complete your projects faster without compromising on quality. So why not give it a try? Experience the ease and convenience of using a diamond multi-placer for yourself and take your diamond painting skills to new heights.
Utilize a Flat Service That Doubles as a Mobile Workspace
You can make your diamond painting process more convenient by utilizing a flat surface that also serves as a mobile workspace. Imagine having the freedom to work on your masterpiece wherever you go, without compromising on comfort or convenience.
Gone are the days of being confined to a single spot in your home while working on your diamond painting project. By using a portable flat surface, you can easily move from room to room or even take it with you when traveling. This innovative solution allows you to work on your diamond painting whenever inspiration strikes.
Not only does this flat surface provide mobility, but it also ensures that your diamonds stay in place and organized. No more worrying about accidentally knocking over containers filled with precious gems! The flat surface provides stability and prevents any accidental disturbances while you work.
Embrace innovation and embrace the freedom of working on your diamond painting projects anytime, anywhere. Let this mobile workspace be a tool for convenience and inspiration as you create stunning works of art.
Stop Static Cling with Dryer Sheets
To prevent static cling in your workspace, simply rub a dryer sheet over the surface. Dryer sheets are not just for laundry anymore; they can be a game-changer in your diamond painting journey.
Static cling is a common nuisance that can make it difficult to work with delicate diamond drills and cause frustration during the process. But with the simple act of using dryer sheets, you can stop static cling in its tracks.
When working on your diamond painting project, static can often build up on the canvas or even on your hands, causing the drills to stick together or jump out of place.
By rubbing a dryer sheet over the surface of your workspace before you begin, you create a barrier that prevents static from forming. This innovative solution will ensure smooth and hassle-free diamond painting sessions.
Not only do dryer sheets eliminate static with ease, but they also have additional benefits. They help keep dust and lint at bay, ensuring that your canvas remains clean throughout the process. Moreover, using dryer sheets before framing your finished masterpiece helps reduce the chances of any stray fibers sticking to it.
So next time you sit down to work on your diamond painting project, don’t forget to grab a dryer sheet and give yourself an edge – both against static cling and for creating a stunning legend before framing.
Find Wax Alternatives Like Putty
Now that you’ve learned how to stop static cling with dryer sheets, let’s move on to another top tip for your diamond painting journey. If you’re looking for diamond painting wax alternatives, consider using putty.
Putty is a versatile and innovative solution that can replace traditional wax in diamond painting. It offers a strong adhesive quality, allowing your diamonds to stick securely onto the canvas. The best part? Putty doesn’t leave any residue behind like wax does, making it easier to clean up after you’re done.
To use putty as a wax alternative, simply take a small amount and roll it into a ball between your fingers. Then, press the diamond drill onto the sticky surface of the putty and pick it up easily. The putty will hold the diamond in place until you’re ready to place it on the corresponding symbol.
Not only does putty provide an effective alternative to wax, but it also offers better control and precision when placing diamonds on your canvas. So if you’re tired of dealing with messy waxes or want a more convenient option, give putty a try for your next diamond painting project!
Use Parchment Paper or Release Paper as Canvas Protection
If you’re looking for a way to protect your canvas, consider using parchment paper or release paper as an alternative. These innovative solutions can provide an extra layer of protection to ensure the longevity and pristine condition of your diamond painting.
Parchment paper, also known as baking paper, is made from natural materials and is heat resistant. It creates a barrier between the canvas and any potential damage that may occur during the diamond painting process.
Release paper, on the other hand, is specifically designed for protecting various surfaces during art projects. It has a smooth surface that prevents paint or adhesive from seeping through, keeping your canvas safe and clean. Both parchment paper and release paper are easily accessible at most craft stores or online retailers.
To use these protective papers effectively, simply place them over your canvas before starting your diamond painting project. The smooth surface will allow the diamonds to adhere properly without causing any damage or leaving residue behind.
Once you’re done with your masterpiece, carefully remove the parchment paper or release paper to reveal a flawless canvas beneath.
Get Rid of Wrinkles with a Heating Pad
Eliminate wrinkles in your canvas effortlessly by using a heating pad. Wrinkles can be a frustrating obstacle when working on your diamond painting project, but with this innovative tip, you can smooth out those pesky creases in no time. Here’s how to do it:
- Prepare the heating pad: Plug in your heating pad and set it to a low or medium heat setting. Make sure it is evenly heated before proceeding.
- Place the canvas on the heating pad: Lay your canvas flat on top of the heating pad, ensuring that the wrinkled areas are directly in contact with the heat source.
- Cover the canvas: Take a piece of cloth, such as a damp microfiber cloth, and gently place it over the canvas. This will protect the surface while allowing heat to penetrate through.
- Apply gentle pressure: Press down lightly on the cloth-covered canvas using your hands or a flat object like a book. The combination of heat and pressure will help relax and smoothen out any wrinkles.
Remove Wrinkles with an Iron
To remove wrinkles from your canvas, simply plug in the iron and set it to a low or medium heat setting. Ironing is a quick and effective way to smooth out any unwanted creases on your fabric.
Start by laying your canvas flat on an ironing board or any sturdy surface. Place a clean cloth over the wrinkled area to protect the delicate fibers of the fabric. Make sure the cloth is slightly damp, as this will help generate steam that further aids in removing wrinkles.
Once you have everything set up, run the warm iron gently over the cloth-covered wrinkles in a back-and-forth motion. Apply light pressure and avoid leaving the iron in one spot for too long to prevent scorching or damaging your canvas. As you glide the iron over the fabric, be mindful of any intricate details or beads on your diamond painting.
Repeat this process until all wrinkles are gone, taking care not to overhear or stretch your canvas excessively. Once finished, allow your canvas to cool down before handling it again.
With these simple steps, you can effortlessly remove stubborn wrinkles from your canvas using an iron and enjoy a smooth and flawless finish for your diamond painting masterpiece.
Store Extra Diamond Drills for Future Projects
When storing extra diamond drills for future projects, make sure you label them clearly to easily identify the colors and shapes. This simple step will help you stay organized and save time when you’re ready to start your next masterpiece.
To ensure the longevity of your diamond painting supplies, consider investing in high-quality diamond containers that provide airtight storage. These containers will keep your diamonds safe from dust, moisture, and other potential damage.
Here are four reasons why properly storing your extra diamond drills is essential:
- Avoid confusion: By labeling each container with the corresponding color code or shape, you’ll never have to waste time searching for the right diamonds again.
- Prevent waste: Storing leftover diamonds from unfinished diamond paintings allows you to reuse them later for different projects or as replacement diamonds.
- Protect investment: Proper storage ensures that your precious diamond painting supplies remain in pristine condition, preventing any unnecessary expenses due to damaged or lost drills.
- Spark creativity: Having an organized collection of labeled diamond containers can inspire new ideas and encourage innovative combinations for future projects.
So take a few minutes to label and store your extra diamond drills today – it’s a small action that can make a big difference in enhancing your overall diamond painting experience!
Properly Frame and Seal Your Painting After Completing
After completing your diamond painting, it’s important to properly frame and seal it to protect your masterpiece. Framing not only enhances the overall appearance of your painting but also keeps it safe from dust, moisture, and potential damage. Here are some top tips to help you frame and seal your painting like a pro.
First and foremost, choose a frame that complements the colors and style of your diamond painting. Consider using a shadow box frame for added depth and dimension.
Next, make sure to clean your painting thoroughly before framing it. Use a lint roller or soft brush or cloth to remove any dust or debris that may have accumulated during the completion process.
Once your painting is clean, carefully place it inside the chosen frame. Ensure that it fits snugly without any wrinkles or creases. To seal the edges and prevent any movement, use acid-free tape or adhesive strips specifically designed for framing artwork.
Finally, protect your painting from environmental factors by adding glass or acrylic sheeting over the front of the frame. This will shield it from UV rays and keep it safe from accidental spills or scratches.
Use Nail Polish Remover to Remove the Legend Before Framing
Using nail polish remover is an effective way to remove the legend from your completed diamond painting before framing it. This innovative technique allows you to create a clean and professional look for your artwork. Here are three reasons why using nail polish remover is a game-changer for diamond painters like you:
By using nail polish remover, you can quickly and easily remove the legend from your canvas without damaging the delicate diamond beads or the painted image underneath. It saves you time and effort compared to other removal methods.
The brush applicator that comes with most nail polish removers allows you to target specific areas of the legend, ensuring that only the unwanted markings are removed. This level of precision ensures that your diamond painting remains intact and flawless.
Nail polish removers are available in different formulations, such as acetone-based or non-acetone options, giving you a choice depending on your preferences and needs. Whether you prefer a stronger solvent or a gentler approach, there is a suitable option for everyone.
Use These Diamond Painting Top Tips For Your Next Work of Art
In each diamond lies a unique sparkle of your individuality, a chance to embrace uniqueness. Let your hands craft memories, emotions, and connections, for each canvas is a story waiting to be told.
Your diamond painting journey is a tapestry of creativity that deserves to be shared. Connect with fellow enthusiasts, learn, and celebrate the extraordinary art of diamond painting.
So go ahead, immerse yourself in the kaleidoscope of colors, and let your imagination take flight. Your canvas awaits, ready to be transformed by your unique touch. The extraordinary isn’t just in the diamonds; it’s in you.
Happy diamond painting!
Frequently Asked Questions
How Do I Remove Wrinkles From My Diamond Painting Canvas?
To remove wrinkles from your diamond painting canvas, start by laying it flat and gently ironing the backside with a low heat setting. Be cautious not to apply too much pressure or heat to avoid damaging the diamonds.
What Is the Best Way to Store Extra Diamond Drills for Future Projects?
Storing extra diamond drills for future projects? The best way to keep those little gems safe is by using small plastic containers. Label them for easy access and organization. Happy sparkling!
Can I Use Something Other Than Wax to Adhere the Diamonds to the Canvas?
You can totally use other adhesives like gel or double-sided tape to stick the diamonds to the canvas. It’s a creative way to explore and find what works best for you!
How Do I Remove the Legend From My Diamond Painting Before Framing?
To remove the legend from your diamond painting before framing, gently peel it off using a craft knife or tweezers. Be careful not to damage the canvas or the diamonds as you go.
What Are Some Alternatives to Using a Diamond Multi-Placer for More Efficient Crafting?
To craft more efficiently without a diamond multi-placer, consider using tweezers or a wax pencil to pick up and place the diamonds. These alternatives can save you time and make your diamond painting experience more enjoyable.

Robbie discovered diamond painting during the pandemic to help him find something to do while being inside. This has led to his learning everything he can about painting with diamond drills, from where to find the best diamond paint kits to how to store all the accessories and tools. He wants to share his love of this hobby and create a community of sharing information.

Clever Diamond Painting Storage Hacks Revealed

Diamond Painting for Kids: The Ultimate Craft Adventure

What to Look for When Buying a Diamond Painting Kit

Finding The Right Diamond Painting Accessories and Tools

Diamond Painting Top Tips And Tricks

Step-By-Step Instructions to Diamond Painting

Discover the World of Diamond Painting
-
 Accessories2 years ago
Finding The Right Diamond Painting Accessories and Tools
-
 Accessories1 year ago
Clever Diamond Painting Storage Hacks Revealed
-
 About Diamond Painting2 years ago
Discover the World of Diamond Painting
-
 Tutorials2 years ago
Step-By-Step Instructions to Diamond Painting
-
 Diamond Paint Kit Reviews2 years ago
What to Look for When Buying a Diamond Painting Kit
-
 Diamond Painting For Kids2 years ago
Diamond Painting for Kids: The Ultimate Craft Adventure